Followers

Monday 8 August 2016

Quilling Love

HI, 
Its been a while since I took up my quilling tool and some paper strips..
Few days back a friend demanded a card especially with quilled flowers on it..So here I am sharing my pretty little card :)
I have used the Papericious Wooden collection- one collection I totally love..
I am addicted to malaysina flowers when i get to quilling..and this time also it proved right :P I could not stop myself from executing another set of Malaysian flowers.
The stamped sentiment is from Altenew and the birthday diecut from Technique Tuesday.


Entering the card in Papericious July challenge
 
(I have used papericious wooden collection, mulberry flowers from the mood board)

Do leave some love :)
Keep Crafting.


Friday 5 August 2016

Inspired Me!!

Hi there, 
I saw this video and blog post on a quick die cut and watercolor effect card on K Werner Design Blog and YouTube channel..and was inspired to try few on my own.Since i loved making one tried few others in different colors..you can say practicing them :P
For these I have used Technique Tuesday 'say it-Birthday' die and some distress inks( mustard seed,peacock feathers,salty ocean,mowed lawn,picked raspberry,vintage photo).
Have used black adhesive glitter paper from a local brand for edges and die cutting the sentiment. Next stuck some sequins and the card is done!!..
The coordinated sentiments come from a mix of stamp sets i have.(Winnie and Walter, Avery Elle,Mudra stamps)


Hope you like my trials..
Do leave some love in comments :)
Keep crafting!!


Live Simply

Hi there, 
The largest home grown craft store in India..Itsy Bitsy has come with there latest designs of stamps..and I am already loving them.
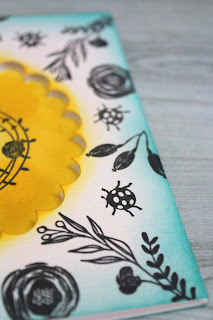
So here is a quick card i made using these..
I have taken a square textured card and die cut the central area using Spellbinders Large Scallop die set. 
For stamping I used Misti stamping tool..and the more you use it the more you think about the right choice of having it in your stash. Have used this tool to stamp the images in four equal sections of repeat images and since my card stock was textured getting clear images in one time was difficult, and Misti again comes to rescue.
The inks used are Memento Tuxedo black..an all time fav black ink for crisp images. Also used distress inks(mustard seed, peacock feathers).
I have used Itsy Bitsy Dream clear stamp for this card.And like its quality and outcome on paper.


Tuesday 2 August 2016

Fun filled Layout

Hi there, here I am with my latest post for Itsy Bitsy blog..
Have u checked out WRMK 'albums made easy" range...they have huge collection with linen as well as leather album in some cool colors. If you like keeping photo "positives" for a memory, or creating scrapbook layouts than these are for you.
These are 12x12 inch D-ring albums with metal corner and spine accents. The album includes photo sleeves and page protectors (though you can get wide variety of WRMK LINEN ALBUMS.)
And whats more...these hold up to 100 pages..that is a lot of photos and some amazing memories.

So lets gets started...in my DT kit I got this lovely Butter colored Linen album..
And some very pretty papers from Mixed Company pattern paper and  Maggie Holmes pattern paper from Crate paper.
The packaging says 12x12 inch but believe me its 15x12 inch for the album cover (that is a huge space!!) 


You can design it in many ways..mix media, stamping, shabby chic layouts or simple scrapbook layouts..I chose to do a bright scrapbook layout. 


For the layout I decided on a layered look with distressed edges.
For the edges you can use a pair of scissors(blade side) to distress it and than ink it on the edges. Any inks can be used.


More layers are in the form of tags ..these are hand cut, used eyelet punch/setter and some satin ribbons.Notice the 'Dream' word that is from the latest stamp release at the store. Lovely designs..if you still haven't got them I recommend putting some in shopping cart.


If you are following our blog you would have read my post on wrmk Banner tool..(i created some huge banners there!) here is a cute little penant and flag banner with little gem alphabets. Stuck the banner with hemp twine.


The center of the cover houses space for 4x4 inch photo. I have cut the rectangle ornate chipboard piece at opposite ends and stuck in a way that it forms perfect space for a 4x4 inch photo.This is the focal point of this album cover.
These chipboard can be hand painted, heat embossed or used as it is...I am a big hoarder of these and love to paint or heat emboss them. Here I have painted them in gold.


And now the embellishing journey starts..I love these paper flowers ,you add them to any project and the looks just pops out!..
And yes before I forget since these are linen album they took so well to the stenciling.I used a script stencil( stencils are great for breaking the monotonous backgrounds and adding some depth).
Also have used a bit of  tiger tail near the bottom leaf.And some enamel dots finish the project.


Here is the complete layout for this album cover page.


Hope you liked the makeover ...Do leave some love in the comments.
Thanks
Happy crafting!!